- Published at
使用Vanilla JS + FastAPI 製作 To-do List

回歸最原始的HTML+JS+CSS
- Authors
-
-

- Name
- Zup
-
Table of Contents
Why
現在各種框架都在蓬勃發展,無論是React、Vue,甚至jQuery都要出最新版了,不過在被這些創新弄得眼花撩亂時,是時候回歸初衷了。
不用任何框架,用原生的Javascript來做一個To-do list!
除了Vanilla JS前端外,後端則選用FastAPI作為框架,資料庫為求方便使用MongoDB。
不過對於前端,為了找回最一開始純潔的模樣,所以特別規定不能使用任何第三方套件,來看看去掉這些現代工具後,我們還能怎樣達成任務。
後端:FastAPI & MongoDB
FastAPI是Python的框架。對於一個To-do list來說,需要有:
-
讀取全部資料
-
新增一項資料
-
刪除一項資料
而對於儲存資料來說,使用pymongo來與資料庫互動。
設置環境
為了開發方便,使用python虛擬環境可以將專案與系統隔離,這樣不論任何修改都不會影響到作業系統,真的壞掉了也只要重新建立一個就行。
python3.11 -m venv .venv
#建立名為.venv的python 3.11虛擬環境
建立虛擬環境的指令不論在Windows, MacOS, Linux都相同。不過啟動虛擬環境的指令就有些不同了。
.\.venv\Scripts\activate #Windows PowerShell
source ./.venv/bin/activate #Linux & MacOS (Unix-like)
為避免錯誤,所有指令都要在虛擬環境中運行。啟用後,就能使用pip來安裝套件了。
pip install "fastapi[all]" pymongo python-dotenv
後端的檔案結構應該長這樣
backend/
├─ .venv/
├─ .env
├─ main.py
後端的code都會放在main.py,而.env則是儲存環境變數,敏感資訊就放在這裡。
接著就可以開始寫了。
環境變數.env
MongoDB connection string這種不想洩漏給別人知道的東西,可以透過環境變數存起來,這樣子就可以保障程式碼的安全。
.env
MONGODB_URI = "your MongoDB connction string"
編輯檔案:main.py
類似express.js,初始化FastAPI
from fastapi import FastAPI
app = FastAPI()
若有想要自定義cors,只要加入幾行就可以了
from fastapi.middleware.cors import CORSMiddleware
origins = [ #自定義允許的網域
    "*", # "*" 代表允許所有來源網站
    "http://example.com" #自定義允許的網址
]

app.add_middleware(
    CORSMiddleware,
    allow_origins=origins,
    allow_credentials=True,
    allow_methods=["*"],
    allow_headers=["*"],
)
接著建立API端點(API Endpoint)
@app.get("/") #get代表http method中的 "GET"
def root(): #隨意名稱都行
  return {"hello": "world"}
根據官方文件,使用Uvicorn來啟動
uvicorn main:app --reload
預設的dev server網址應該是http://localhost:8000,以瀏覽器進入之後,應該就會看到
{ "hello": "world" }
這樣子一個FastAPI Endpoint就算建立成功了。
設定MongoDB資料庫
首先要做的第一件事情,就是把環境變數匯進來。
import os
from dotenv import load_dotenv

load_dotenv()
MONGODB_URI = os.getenv("MONGODB_URI")
這樣子,就算MongoDB connection string存在完全不同的檔案裡(.env),主程式也可以存取了。
接下來要來連接資料庫,方法很簡單。
from pymongo import MongoClient

try:
    mongo_client = MongoClient(MONGODB_URI)
    print("connect to MongoDB")
except:
    print("Cannot connect to MongoDB")
MongoDB的資料庫分好幾層,由上而下分別為
project/
├─ cluster/
│  ├─ database/
│  │  ├─ collection/
而connection string就已經包含到cluster的資料了,所以下面只要處理database與collection就好了。
db = mongo_client["ToDo"]
collection = db["data"]
MongoDB會自動新增不存在的資料庫與collection,所以無需太擔心。
新增資料
使用formData來傳輸資料
from fastapi import FastAPI, Form
from typing import Annotated

@app.post("/post")
async def newPost(name: Annotated[str, Form()]):
    text = name
    collection.insert_one({"name": text})
    return "ok"
刪除資料
使用Dynamic Route來定義API Endpoint.
@app.get("/post/{id}")
async def deletePost(id: str):
    collection.delete_one({"_id": ObjectId(id)})
    return "ok"
因為DELETE方法不是原生的http method,雖然這樣不太好,但這裡還是使用GET來觸發刪除資料。
另外,這裡的id型別為string,需要轉換為ObjectId,不然MongoDB會無法識別。
取得資料
正當你以為使用collection.find()就會回傳所有的資料時,才發現事情沒有這麼簡單。
來看一下w3school怎麼寫:
import pymongo

myclient = pymongo.MongoClient("mongodb://localhost:27017/")
mydb = myclient["mydatabase"]
mycol = mydb["customers"]

for x in mycol.find({},{ "address": 0 }):
  print(x)
換句話說,若要取得所有資料,必須遞迴才能一一取出。
根據新增資料的寫法,資料型別應該為
{
  "_id": ObjectId("id"),
  "name": string
}
所以在回傳之前,要把ObjectId轉成string,才能以正確的json回傳。
@app.get("/post")
def getPosts():
    data = collection.find({})
    list = []
    for x in data:
        list.append({
            "_id": str(x["_id"]),
            "name": x["name"]
        })
    return list
回傳的資料型別為
type Data = {
  _id: string;
  name: string;
}[];
這樣取得所有資料的Endpoint就算完成了。後端大致上完成,接下來處理前端。
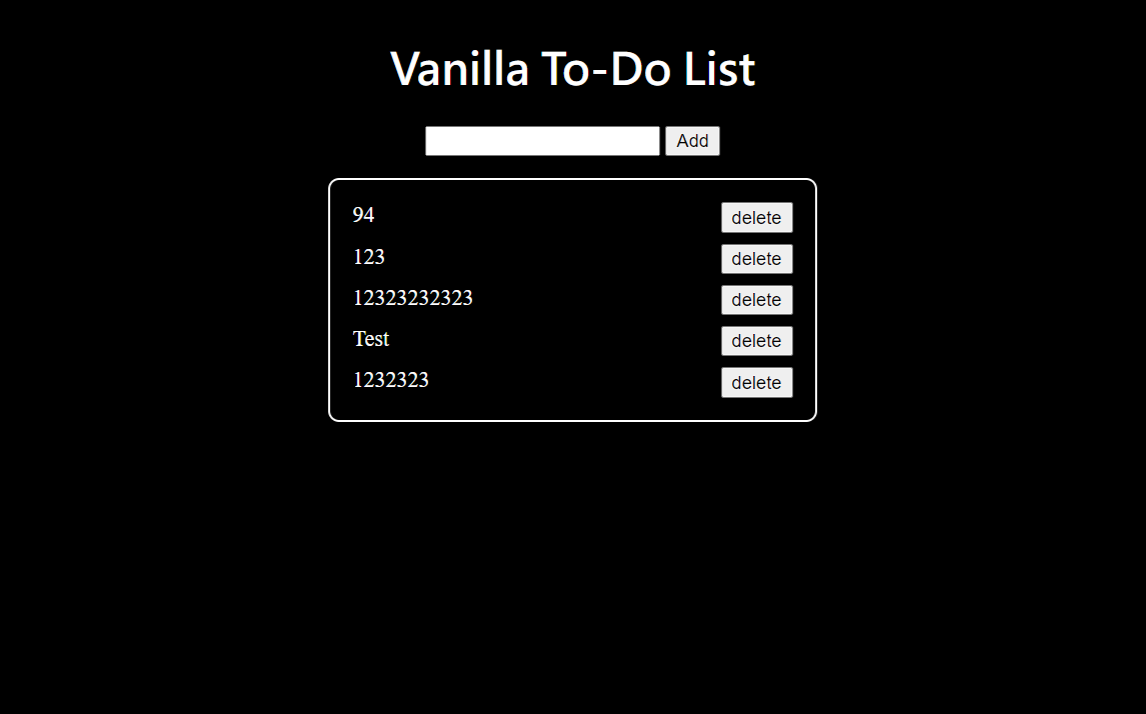
前端:HTML+JS+CSS
有三個檔案
frontend/
├─ index.html
├─ index.js
├─ styles.css
網站模板寫在index.html,而取得資料、更新、刪除的邏輯是index.js處理,而styles.css決定了網頁的樣子。
網頁模板:index.html
除了基本的html boilerplate以外,還要連結index.js與styles.css
<!doctype html>
<html>
  <head>
    <meta charset="utf-8" />
    <meta name="viewport" content="width=device-width, initial-scale=1.0" />
    <link rel="stylesheet" href="styles.css" />
    <title>Vanilla To-Do List</title>
  </head>
  <body>
    <h1>Vanilla To-Do List</h1>
    <main>
      <div>
        <input id="input" type="text" name="input" />
        <button id="submit">Add</button>
      </div>
      <div id="list"></div>
    </main>
  </body>
  <script src="index.js"></script>
</html>
styles.css透過<link>來連結,而index.js則是透過<script>來匯入。雖然可以直接寫在檔案哩,不過分開來易讀性會比較高。
網頁邏輯:index.js
當網頁載入時,希望能根據各種情境而觸發不同的功能。
-
當網頁載入完成時,能夠發送http request給後端,取得所有資料並展開至畫面
-
當按下delete按鈕時,能夠聯繫後端,刪除該筆資料並更新畫面
-
當按下新增按鈕時,如果
<input />有值,則新增一個To-do並更新畫面
取得資料以及建立刪除按鈕
const url = "http://127.0.0.1:8000";
const list = document.getElementById("list");

window.addEventListener("load", async () => {
  fetch(`${url}/post`)
    .then(res => res.json())
    .then(res => {
      res.map(item => {
        const div = document.createElement("div");
        div.id = "item";
        const span = document.createElement("span");
        span.textContent = item.name;
        div.appendChild(span);
        // 刪除按鈕
        const btn = document.createElement("button");
        btn.textContent = "delete";
        btn.addEventListener("click", async () => {
          fetch(`${url}/post/${item["_id"]}`).then(() =>
            window.location.reload()
          );
          // 完成刪除後,重新整理畫面,資料會重新fetch後再渲染至畫面
        });
        div.appendChild(btn);
        list.appendChild(div);
      });
    });
});
取得的資料是一個array,透過forEach對每一個元素展開,寫成JSX會像是
res.map(item=>{
  const handleClick = async (id) => {
    fetch(`${url}/post/${item["_id"]}`)
      .then(()=>window.location.reload())
  }
  return (
    <div id="item">
      <span>{item.name}</span>
      <button onClick={()=>handleClick(item["_id"])}>
        delete
      </button>
    </div>
  )
}
這樣寫果然好懂得多,也難怪現在有這麼多Frontend Framework幫我們解決這些問題。
新增To-do
首先取得<button>,<input>元素
const input = document.getElementById("input");
const submit = document.getElementById("submit");
當按下<button id=”submit”>時,若input有值,則post一個資料。
submit.addEventListener("click", async () => {
  const text = input?.value;
  if (text) {
    const formdata = new FormData();
    formdata.append("name", text);
    fetch(`${url}/post`, {
      method: "POST",
      body: formdata,
    }).then(() => window.location.reload());
  }
});
自定義畫面:styles.css
簡單裝飾一下網站
body {
  background-color: black;
  color: white;
  display: flex;
  flex-direction: column;
  align-items: center;
}

main {
  width: 100%;
  display: flex;
  flex-direction: column;
  align-items: center;
  gap: 1rem;
}

h1 {
  font-family:
    system-ui,
    -apple-system,
    BlinkMacSystemFont,
    "Segoe UI",
    Roboto,
    Oxygen,
    Ubuntu,
    Cantarell,
    "Open Sans",
    "Helvetica Neue",
    sans-serif;
}

#list {
  width: 20rem;
  border: 0.1rem solid white;
  padding: 1rem;
  border-radius: 0.5rem;
  display: flex;
  flex-direction: column;
  gap: 0.5rem;
}

#item {
  width: 100%;
  display: flex;
  justify-content: space-between;
}
這樣子用原生Javascript寫的To-do App就完成了!