- Published at
Vite + React + TS + FFmpeg WASM

使用ffmpeg.wasm與React製作一個轉檔程式
- Authors
-
-

- Name
- Zup
-
Table of Contents
初始化專案
新增一個專案
pnpm create vite@latest
選擇React之後,專案建立完成。
接著設定TailwindCSS,根據官網的指引,安裝套件並初始化
pnpm add -D tailwindcss postcss autoprefixer
pnpm dlx tailwindcss init -p
(溫馨提醒,這裡的npx是對應pnpm dlx,但有時不能直接這樣交換)
安裝好後,因為想要在所有元件裡面使用,因此去tailwind.config.js修改content欄位
/** @type {import('tailwindcss').Config} */
export default {
  content: [
    // content原本是空的,把這些加進去
    "./index.html",
    "./src/**/*.{js,ts,jsx,tsx}",
  ],
  theme: {
    extend: {},
  },
  plugins: [],
};
接著,去掉新增專案時所有生成的css,index.css寫上這三行
@tailwind base;
@tailwind components;
@tailwind utilities;
(我也把App.css裡面全部清空了)
接著開啟dev server,如果看到樣式全部跑掉,就代表成功了。
安裝ffmpeg.wasm
使用套件管理器安裝
pnpm add @ffmpeg/ffmpeg @ffmpeg/util
在開始coding前,先調整一下vite的設定檔,讓ffmpeg可以正常運作。
vite.config.ts
import { defineConfig } from "vite";
import react from "@vitejs/plugin-react";

// https://vitejs.dev/config/
export default defineConfig({
  plugins: [react()],
  optimizeDeps: {
    exclude: ["@ffmpeg/ffmpeg", "@ffmpeg/util"],
  },
  server: {
    headers: {
      "Cross-Origin-Opener-Policy": "same-origin",
      "Cross-Origin-Embedder-Policy": "require-corp",
    },
  },
});
在使用前,必須要先把ffmpeg.wasm從網路上下載到你的電腦裡。因為這個檔案很大,20幾MB,所以才需要做這些額外的loading。
import { useEffect, useRef, useState } from "react";
import { FFmpeg } from "@ffmpeg/ffmpeg";
import "./App.css";
import { toBlobURL } from "@ffmpeg/util";

function App() {
  const ffmpegRef = useRef(new FFmpeg());
  const messageRef = useRef<HTMLParagraphElement | null>(null);
  const [isFFmpegLoading, setIsFFmpegLoading] = useState(true);

  useEffect(() => {
    const loader = async () => {
      const baseURL = "https://unpkg.com/@ffmpeg/core@0.12.6/dist/esm";
      const ffmpeg = ffmpegRef.current;
      ffmpeg.on("log", ({ message }) => {
        if (messageRef.current) messageRef.current.innerHTML = message;
      });
      await ffmpeg.load({
        coreURL: await toBlobURL(
          `${baseURL}/ffmpeg-core.js`,
          "text/javascript"
        ),
        wasmURL: await toBlobURL(
          `${baseURL}/ffmpeg-core.wasm`,
          "application/wasm"
        ),
      });
      setIsFFmpegLoading(false);
    };
    loader();
  }, []);

  if (isFFmpegLoading) {
    return "loading";
  }

  return (
    <>
      {/*利用TailwindCSS 將畫面份為左右兩半 // 左邊輸入,右邊輸出*/}
      <main className="grid h-screen w-screen grid-cols-2 bg-slate-700 p-2">
        <div className="flex flex-col gap-2"></div> {/* 輸入 */}
        <div className="flex flex-col gap-2"></div> {/* 輸出 */}
      </main>
    </>
  );
}

export default App;
裡面好像加了些沒有講過的東西…別急,一個個慢慢來。
首先先來看最上層這幾個useState、useRef宣告
const ffmpegRef = useRef(new FFmpeg());
const messageRef = useRef<HTMLParagraphElement | null>(null);
const [isFFmpegLoading, setIsFFmpegLoading] = useState(true);
第一個是FFmpeg的Ref Object,因為React會針對畫面每一次渲染重新建立函數、物件,透過useRef Hook就能保持最一開始的樣子,不會重複建立。
第二個與轉檔時的文字有關。FFmpeg支援將log message輸出,這樣子在過程中就可以即時查看處理的狀態。
第三航的useState很單純,就只是確保當FFmpeg完成載入時,才顯示畫面。
到此為止,基礎設定就用好了,接下來要來處理檔案輸入、預覽與轉換完池後要怎麼顯示、下載的問題。
輸入影片檔
策略:利用<input />將影片檔輸入,用useState存起來,再丟給ffmpeg.wasm處理。
不過在那之前,也做一下輸入影片預覽,至少在轉換時可以看影片轉移注意力。
const [inputVid, setInputVid] = useState<File | null>(null);
function handleInput(e: React.ChangeEvent<HTMLInputElement>) {
  const file = e.target.files ? e.target.files[0] : null;
  if (file) {
    setInputVid(file);
  }
}
return (
  <main className="grid h-screen w-screen grid-cols-2 gap-2 bg-slate-700 p-2 text-white">
    {/* 輸入 */}
    <div className="flex flex-col gap-2">
      <h1 className="border-b-2 border-white py-2 text-center font-mono text-3xl">
        Input
      </h1>
      <input type="file" accept="video/*" onChange={handleInput} />
      {inputVid && (
        <>
          <video controls>
            <source src={URL.createObjectURL(inputVid)} />
          </video>
          <button className="rounded-md border-2 border-white px-3 py-2 text-white transition-all hover:bg-white hover:text-black">
            Convert Video
          </button>
          <p ref={messageRef}></p> {/* FFmpeg運行時的log會呈現在這裡 */}
        </>
      )}
    </div>
    {/* 輸出 */}
    <div className="flex flex-col gap-2">
      <h1 className="border-b-2 border-white py-2 text-center font-mono text-3xl">
        Output
      </h1>
    </div>
  </main>
);
結果長這樣
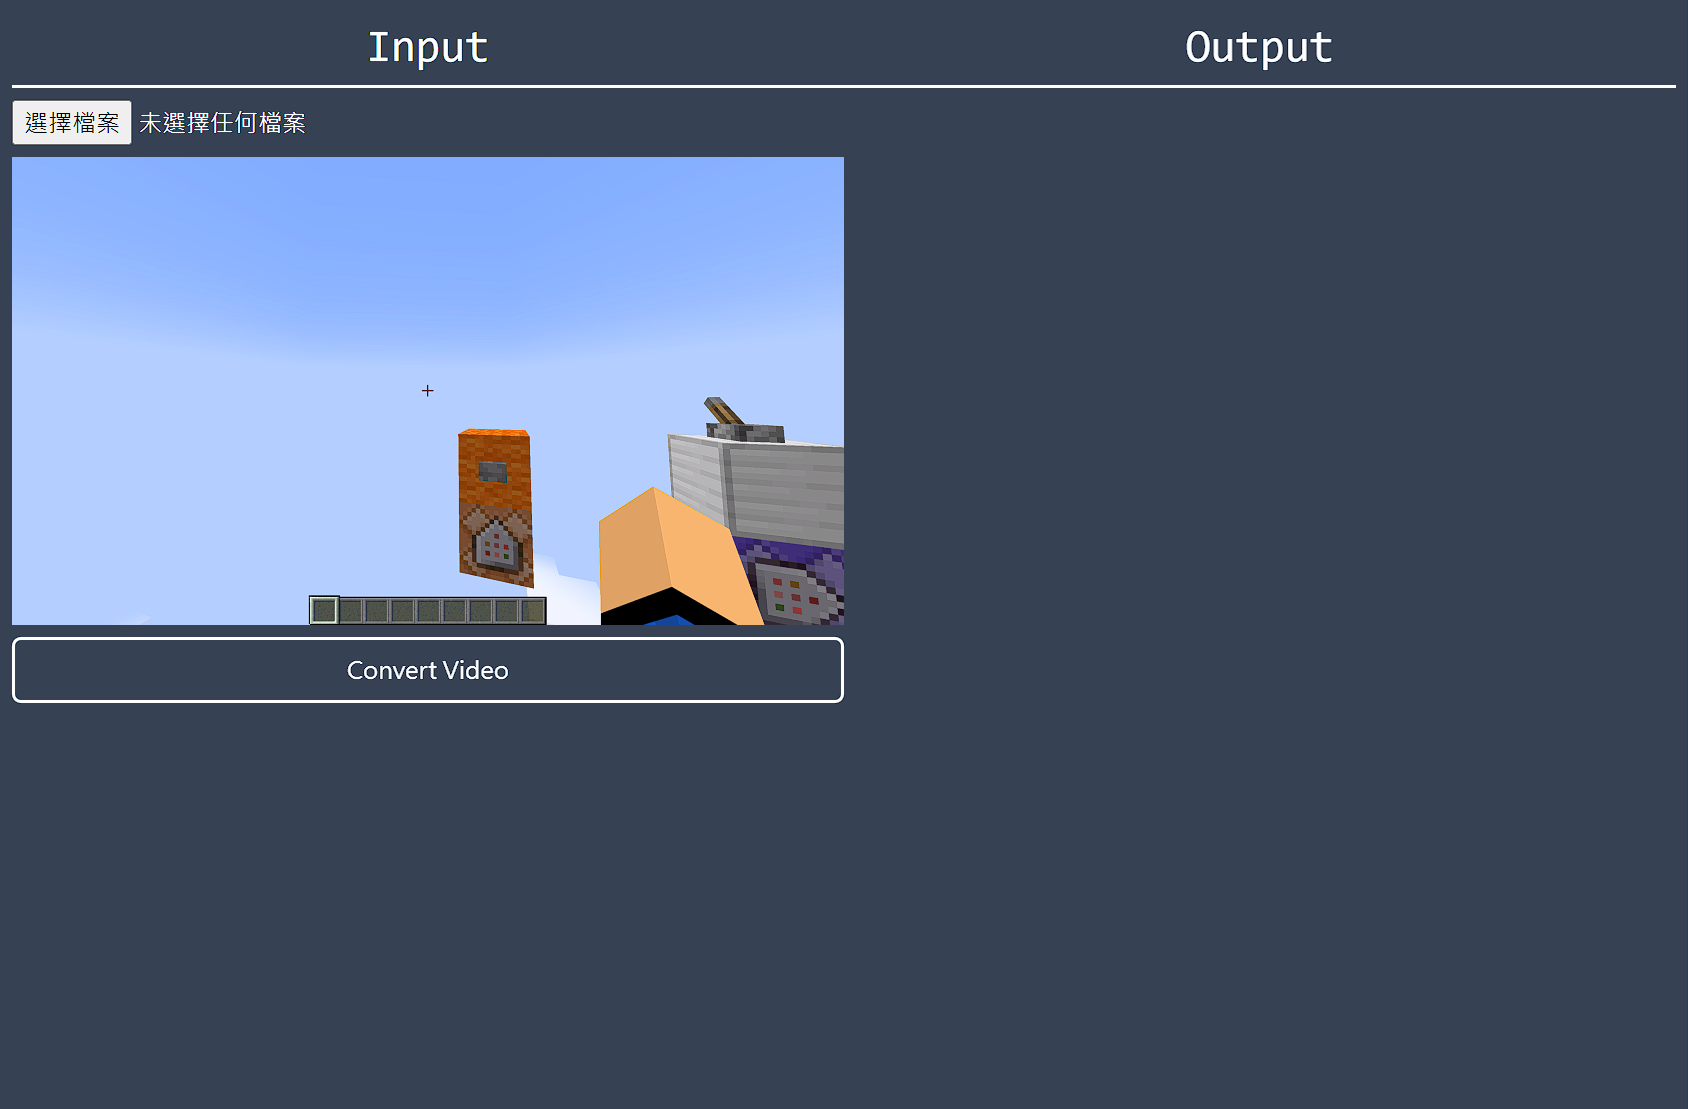
Convert Video
成功把影片匯進來後,接著要把它交給FFmpeg去轉檔。
先來新增一個handle function,與處理完後的useState
const [outputVid, setOutputVid] = useState<string | null>(null);
//  你可能在想,為什麼輸入的`inputVid`型別為File,但這裡的`outputVid`卻是string?
async function handleConvert() {
  if (!inputVid) {
    return;
  }
  const ffmpeg = ffmpegRef.current;
  await ffmpeg.writeFile("input.mp4", await fetchFile(inputVid));
  await ffmpeg.exec(["-i", "input.mp4", "-c:v", "copy", "output.mp4"]);
  const fileData = await ffmpeg.readFile("output.mp4");
  const data = new Uint8Array(fileData as ArrayBuffer);
  setOutputVid(
    URL.createObjectURL(new Blob([data.buffer], { type: "video/mp4" }))
  ); // 因為在這裡就已經把檔案轉為ObjectURL,所以才是string
}
要展示也很簡單,由於已經轉為ObjectURL,因此就可以直接放進HTML Tag裡面的src屬性
{
  outputVid && (
    <>
      <video controls>
        <source src={outputVid} />
      </video>
      <a
        href={outputVid} // See, ObjectURL 可以直接放入src裡面
        className="rounded-md border-2 border-white px-3 py-2 text-center text-white transition-all hover:bg-white hover:text-slate-700"
        target="_blank" // 按下download後,開新的視窗
      >
        Download
      </a>
    </>
  );
}
影片轉檔通常需要花很多時間,不過完成以後,整個頁面看起來會像這樣
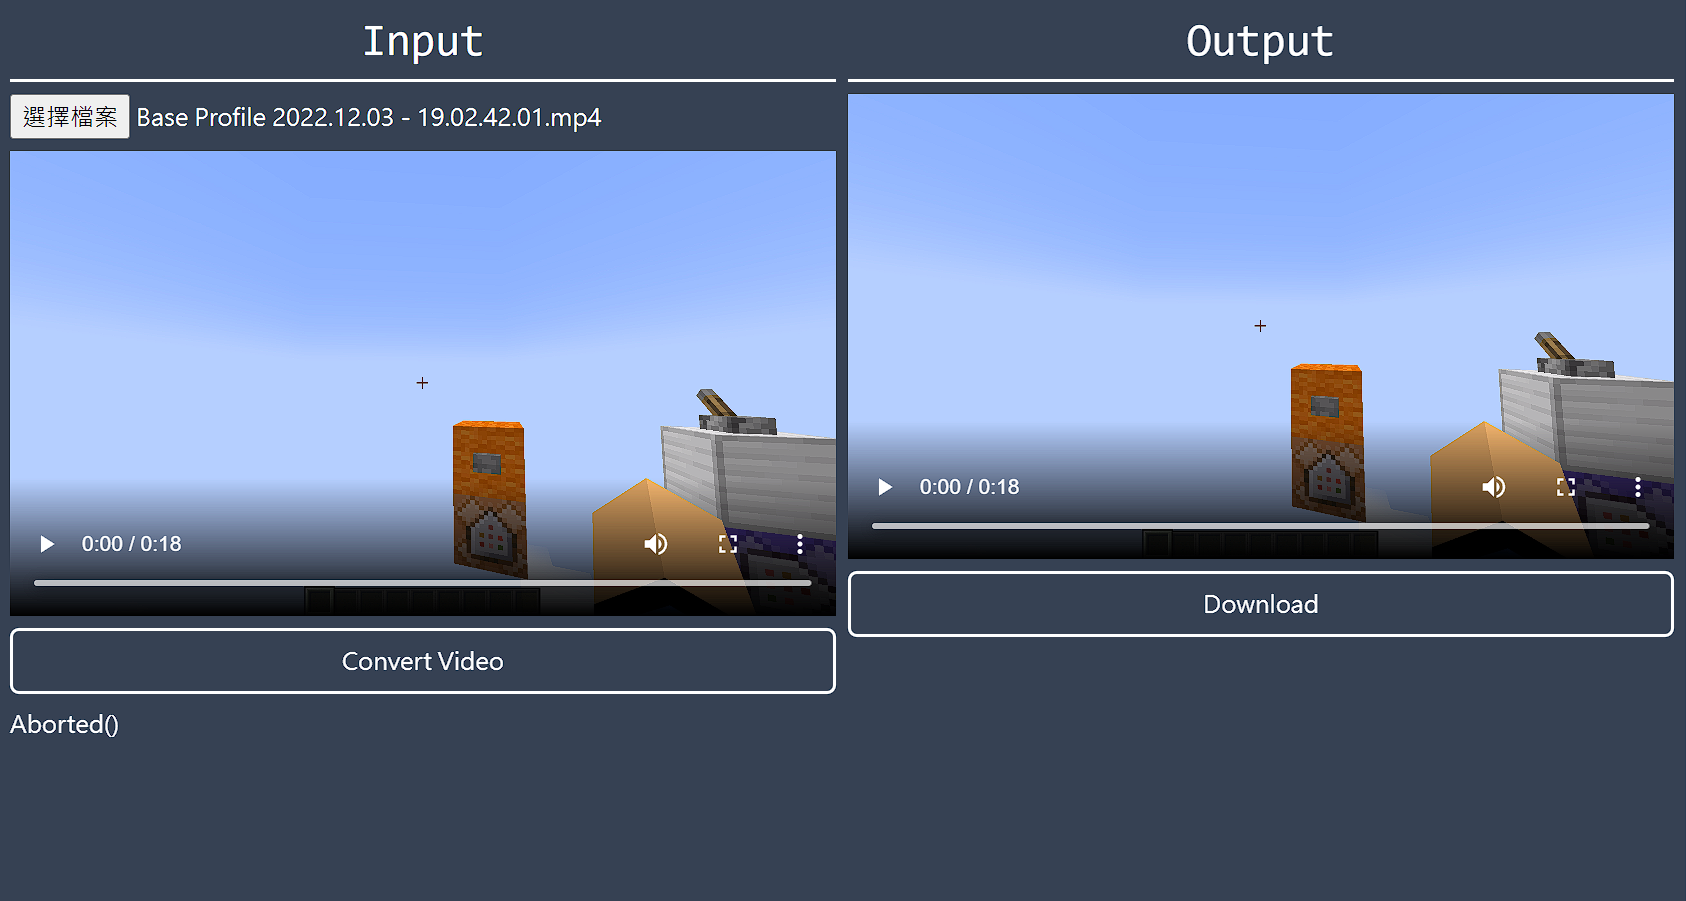
按一下download按鈕應該就能跳去新的頁面,either用瀏覽器撥放or開始下載。
code
import { useEffect, useRef, useState } from "react";
import { FFmpeg } from "@ffmpeg/ffmpeg";
import "./App.css";
import { fetchFile, toBlobURL } from "@ffmpeg/util";

function App() {
  const ffmpegRef = useRef(new FFmpeg());
  const messageRef = useRef<HTMLParagraphElement | null>(null);
  const [isFFmpegLoading, setIsFFmpegLoading] = useState(true);
  const [inputVid, setInputVid] = useState<File | null>(null);
  const [outputVid, setOutputVid] = useState<string | null>(null);

  const handleInput = (e: React.ChangeEvent<HTMLInputElement>) => {
    const file = e.target.files ? e.target.files[0] : null;
    if (file) {
      setInputVid(file);
    }
  };

  async function handleConvert() {
    if (!inputVid) {
      return;
    }
    const ffmpeg = ffmpegRef.current;
    await ffmpeg.writeFile("input.mp4", await fetchFile(inputVid));
    await ffmpeg.exec(["-i", "input.mp4", "output.mp4"]);
    const fileData = await ffmpeg.readFile("output.mp4");
    const data = new Uint8Array(fileData as ArrayBuffer);
    setOutputVid(
      URL.createObjectURL(new Blob([data.buffer], { type: "video/mp4" }))
    );
  }

  useEffect(() => {
    const loader = async () => {
      const baseURL = "https://unpkg.com/@ffmpeg/core@0.12.6/dist/esm";
      const ffmpeg = ffmpegRef.current;
      ffmpeg.on("log", ({ message }) => {
        if (messageRef.current) messageRef.current.innerHTML = message;
      });
      await ffmpeg.load({
        coreURL: await toBlobURL(
          `${baseURL}/ffmpeg-core.js`,
          "text/javascript"
        ),
        wasmURL: await toBlobURL(
          `${baseURL}/ffmpeg-core.wasm`,
          "application/wasm"
        ),
      });
      setIsFFmpegLoading(false);
    };
    loader();
  }, []);

  if (isFFmpegLoading) {
    return "loading";
  }

  return (
    <>
      <main className="grid h-screen w-screen grid-cols-2 gap-2 bg-slate-700 p-2 text-white">
        <div className="flex flex-col gap-2">
          <h1 className="border-b-2 border-white py-2 text-center font-mono text-3xl">
            Input
          </h1>
          <input type="file" accept="video/*" onChange={handleInput} />
          {inputVid && (
            <>
              <video controls>
                <source src={URL.createObjectURL(inputVid)} />
              </video>
              <button
                onClick={handleConvert}
                className="rounded-md border-2 border-white px-3 py-2 text-white transition-all hover:bg-white hover:text-black"
              >
                Convert Video
              </button>
              <p ref={messageRef}></p>
            </>
          )}
        </div>
        <div className="flex flex-col gap-2">
          <h1 className="border-b-2 border-white py-2 text-center font-mono text-3xl">
            Output
          </h1>
          {outputVid && (
            <>
              <video controls>
                <source src={outputVid} />
              </video>
              <a
                href={outputVid}
                className="rounded-md border-2 border-white px-3 py-2 text-center text-white transition-all hover:bg-white hover:text-slate-700"
                target="_blank"
              >
                Download
              </a>
            </>
          )}
        </div>
      </main>
    </>
  );
}

export default App;
結尾
沒想到用ffmpeg.wasm也花了我一番力氣,因為官網提供的範本有些錯誤,原本在load()裡面還有包含workerURL,但現在去看檔案已經消失,所以我把這行給刪掉了。從來也沒想過官方的example會有問題。
Anyway,用ffmpeg.wasm轉影片檔的想法還是很不實際啦,就因為速度太慢了。不過小一點的音樂檔應該還行,單純將影格copy的簡單作業應該也可以,執行函數變成
await ffmpeg.exec(["-i", "input.mp4", "-c:v", "copy", "output.mp4"]);
-c:v代表影像的編碼方式,copy就是直接複製,不做任何處理。
WebAssembly, WASM的優點就是比Javascript快,不過因為種種的限制,不太可能真的取代JS,頂多就只是高計算場景下能起到加速的功能而已。不過有哪個Web App需要如此大量、誇張的Client Side Computing?屈指可數。